One of the questions we consistently get asked is “Why is my version of Windows 10 not up to the latest feature release?”. The answer is simply that Microsoft doesn’t push these feature updates out via the traditional patch management process, so all your patches can be up to date, and you can still have an old version.
So, the next question is always “Well then, how do I update them?”. The answer to this is a little more complicated, and I am hoping that this blog post will help you.
I. First step is identifying the machines that are out of date. There are a few of ways to do this.
1. Look at the OS Version field

The standard Kaseya audit records the OS Version, which contains a “Build” number. The problem is that build number is not what you commonly see mentioned out there. More commonly we hear about the “Version” number, i.e. 1903 or 1909.
Here is a simple cross-reference:
| Version | Build | Initial Release Date |
| 1507 | 10240 | July 2015 |
| 1511 | 10586 | November 2015 |
| 1607 | 14393 | August 2016 |
| 1703 | 15063 | April 2017 |
| 1709 | 16299 | October 2017 |
| 1803 | 17134 | April 2018 |
| 1809 | 17763 | October 2018 |
| 1903 | 18362 | May 2019 |
| 1909 | 18363 | November 2019 |
| 2004 | 19041 | TBD – 1st half of 2020 |
2. Build a View
So, if your memory is anything like mine, it is hard to remember that 18362 = 1903, plus how do we group a bunch of like versions together to figure out what needs to be updated? Answer: Kaseya Views.
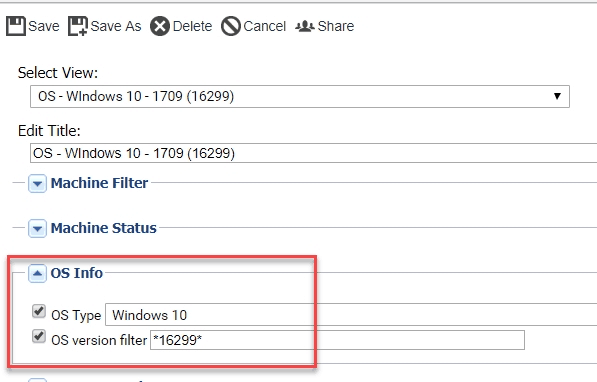
Just create a new View, for each of the builds, i.e. Build 16299 below.
As you can imagine this will get a little visually busy as more and more builds come out, so what about creating a single View that will show ALL Windows 10 machines that are not the current build?
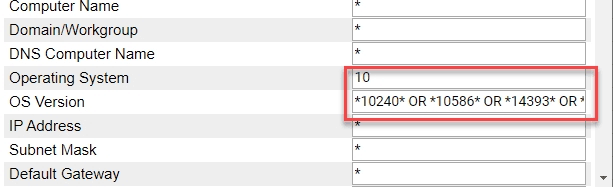
Easy enough! Just create a new View, name it “OS – Windows 10 – Version Release needed”, SAVE it (this is required), THEN click the “Define Filter” box at the bottom.

When the “Advanced Filter” box comes up, update the filter by putting a “10” under the Operating System, and in the OS Version box, put a list of all of the builds that you want to include, putting “*” around each build, and an “OR” between them.
Here is a cut and paste for you that includes everything through 1903 (it will need updating for future releases!)
*10240* OR *10586* OR *14393* OR *15063* OR *16299* OR *17134* OR *17763 OR *18362*
Save and Apply!
3. Last, but not least… What about a script that will update a custom field with the correct release Version? Yep! We have that too!
“Windows 10 Version Audit to Custom Field” will update a custom field called “W10 Version”. Once updated you can show it as a column in your Agent screen:
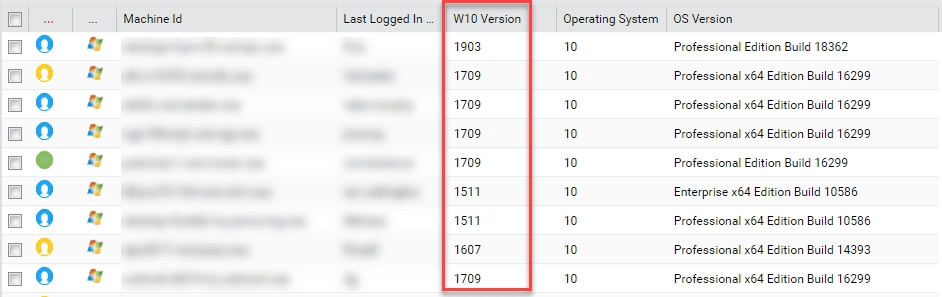
Schedule the script to run once a week and this will keep the field updated. You can also schedule it to run once, if you have just done an update.
You can obviously create views based on this field as well, using the same logic as above.
GREAT! Now you have some options on IDENTIFYING those out-of-date machines, but how do you update them?
II. Updating Windows 10 to latest release
For the last year or so we just referred people to Kaseya’s Automation Exchange. A few people, including Kaseya, had released scripts that seemed to solve the problem, and we figured “Why re-invent the wheel”!
When 1909 came out (Build 18363 for you smarty-pants out there!), we looked at the scripts, and also noticed a number of comments and suggestions like:
- Can you make sure it has over 30GB of Free Space?
- Can you run a Restore Point before you start?
- Can you make sure that the Intel Rapid Storage Technology drivers is not going to cause a problem (it blue screened updates until Microsoft checked for it)
- Can you make sure Windows is Activated?
We took all those suggestions and added our own secret sauce like:
- Email notifications if something seems to fail
- End-user pop-up message letting them know the script is running.
Together, we created what we hope will be a fairly turn-key script for you to use to update these machines.
A few caveats:
- PLEASE test it first!!! Make sure you understand how it works.
- DON’T update your entire customer base at ONCE! It still must download a 3+/GB installer to do this, so you don’t want that happening all at once. Spread it out a little at a time.
- The install can take from 45 minutes to SEVERAL HOURS, so just let it go! You won’t have any idea if it is working or not until it reboots (or doesn’t after 4 hours!)
- IT WILL REBOOT AUTOMATICALLY, likely with little to NO WARNING. We do pop up a message if the user is logged in and you schedule it, but I would try to do these after-hours.
- The Restore Point will only run, IF Restore Points have been enabled on your machine, AND it will be deleted by the upgrade (at some point), so don’t put too much faith in them!
- If you have an aggressive AV, you might want to disable it during the upgrade. AV is always the enemy of new installs. I have personally run it on several system that have Webroot and have not had a problem, but YMMV.
The script is called “Windows 10 Update to latest Build”, and is available on ClubMSP as well inside the Agent Procedures of our hosted Kaseya servers.
We hope you find this script useful, please let us know if you run into any problems or have any suggestions for improvement. PS. Please don’t email us saying “it didn’t work”. a) Give it time, b) Try it on another machine. There are many reasons why it might not work, but unless you get a “FAIL” in the script log, those reasons are probably machine related, and not something we can control.
TROUBLESHOOTING: I would suggest running the Windows 10 Upgrade Assistant manually and see what comes up. That is basically all this script is doing. If you find a switch or a check that we can add, please let us know!