Office is one of the most common software packages you will find in the business world. When provisioning a new machine, Office is often one of the first tools that is installed. So when a partner came to us asking about how to make the process of installing and keeping Office up to date we were happy to oblige.
Originally we wrote a script that would quickly give you a bird’s eye view of which versions of office were installed on your endpoints. But then we dove in deeper and set it up to install the software package so you could simply queue up an install of office from your Kaseya dashboard.
However, we quickly realized we could take this script one step further. So last week we announced our Office 365 Install and Audit script library. It is a series of scripts that allows you to audit your installed versions of office on endpoints and also install / update the Office suite on new devices.
However, this time around you can create a custom XML file which allows you to say WHAT office apps get installed.
Office is a large suite of tools and not everyone needs or wants all the programs that Office supplies. So using a combination of a website provided by Microsoft and some creative development from our scripting team, we were able to put together a solution so you can custom pick which office apps are deployed.
We have condensed this down to 3 (and a half) simple steps.
- Audit for previous installs
- Download the software
- Install the Software
- (Optionally create a custom config)
The beauty of this methodology is that you can pre-stage the installers ahead of time, taking care to spread out the download over some time so you don’t over-tax the customer’s internet bandwidth (less of a concern with WFH), and then execute the upgrade all at once, if you like, over the course of an evening.
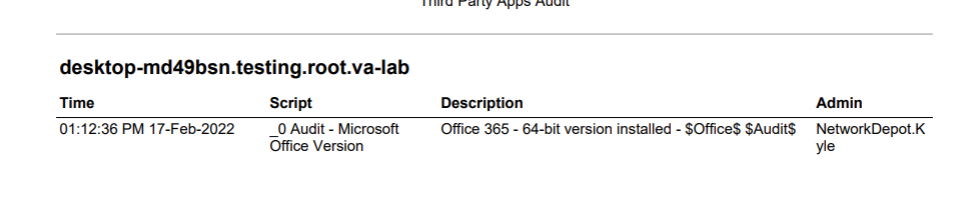
Step 1: Running an Audit
The audit agent procedure included in our folder of scripts will scan your selected machines and then report back on which version of office is installed and it will be saved in Kaseya for later access both as a custom variable ($Office$) which you can report on, and also a column you could add to the table in the Agent tab in Kaseya.
Why would you run this kind of audit? Here are a few possible reasons:
- You want to know if your client machines are all running the latest version of Office. For example, someone might be running an old 2007 version of the Office suite and you just don’t know.
- You want to identify clients who are not running office (G Suite is not uncommon. Or who knows? Maybe you’ll run into the occasional Libre Office user). These people may not show Office installed at all on their systems.
- You would like to have this information at your fingertips while providing support to end users. If they call saying they can’t read a Word document but they’re running a version of Office from 10 years ago, you could save yourself a lot of headache by simply having this information available for your team in Kaseya.
Step 2: Pre-deploy
So now you’ve run your audit, but you want to deploy Office? There is a simple 2 step process to Install office on a new machine. These scripts can be run manually, or you can queue them up with a time delay for auto deployment to new endpoints.
Downloading the correct Office suite to be deployed
First off we have to download Office. There are three scripts included which each download a specific version of office. You simply choose the version you wish to install:
- _1 (Download, Pick 1) Office 365 Business & Bus Premium DL
- _1 (Download, Pick 1) Office 365 Pro/Enterprise/Midsize DL
- _1 (Download, Pick 1) Office 365 Small Business Premium DL
These three scripts refer to the 3 primary version of Office 365. Most of the time you will likely find yourself working with the first two. Business and Business Premium are the versions associated with Microsoft’s “Business Standard” and “Business Premium”, non-enterprise E3 & E5 plans, and Apps for business plans.
The “Pro/Enterprise/Midsize” version refers to Microsoft’s Enterprise E3, E4, & E5 as well as their Midsize, and Apps for enterprise plans.
Those using “Office Small Business Premium” version are using an older CD Box installer from before Microsoft went entirely to the cloud.
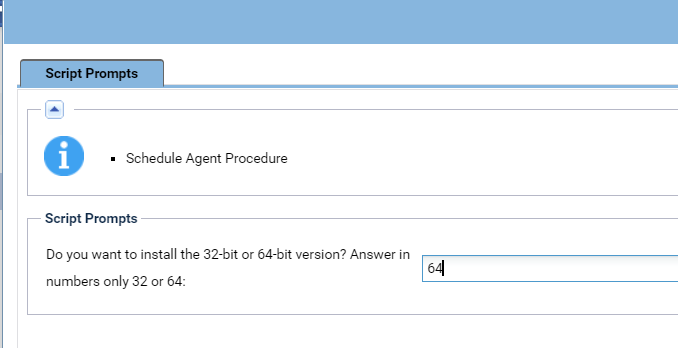
Once you run the appropriate download script, you’ll be prompted to download the 32 or 64 bit versions of the software. So be prepared to answer that question. You may find you schedule the script twice. Once for 32 bit systems and once for 64 bit systems.
Step 3: Install Office
If you just want the entirety of Office with no tweaks then simply run the _4 (Install) Office 365 All Versions Install (After DL) script after downloading the software in step 1. Office will deploy with all the default settings.
Congrats, you’re done and can wrap up and move on to the next project.
But what if you need Visio? Or you don’t want Publisher? Then we need to take an optional step and generate a custom config file to be installed BEFORE downloading Office (step 1) or running the install script (step 2).
The optional half step: Generating a custom configuration to deploy.
Microsoft has created a tool for generating custom install XML files for the Office installer to read. This instructs it to download (or not download) specific parts of the Office suite. It also gives you control of how settings are handled when moving to new versions of office (do you want to remove user settings? Or would you prefer to roll them forward into the new version?
Configuring Office For Deployment
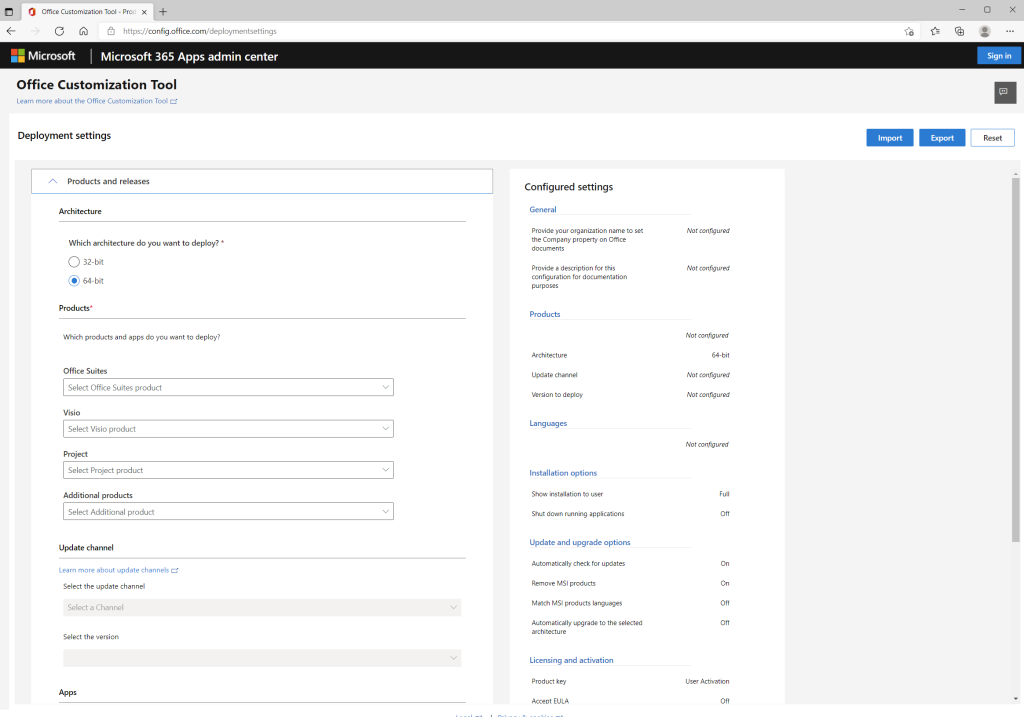
Microsoft offers a bevy of configuration options for deployment. Simply choose the options that are relevant to you, then click next.
A note on 32 vs 64 bit
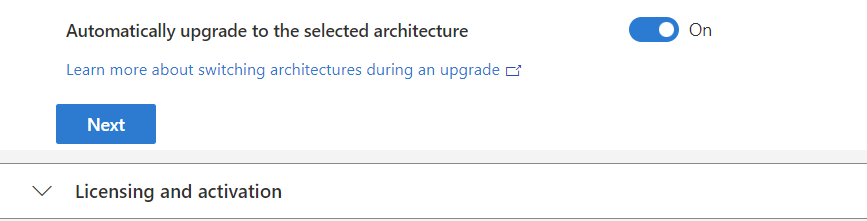
We recommend enabling “Upgrade to the selected architecture” to clear out any 32bit installs and get everyone on 64bit. This will make things easier for you in the future and ensure everyone is using the same version of the software. Of course this assumes they have hardware that can handle 64bit, which is thankfully becoming less of an issue these days.
If you plan on doing 32 and 64 bit separately you will then need to generate XML files for each and run them independently.
Continuing the configuration
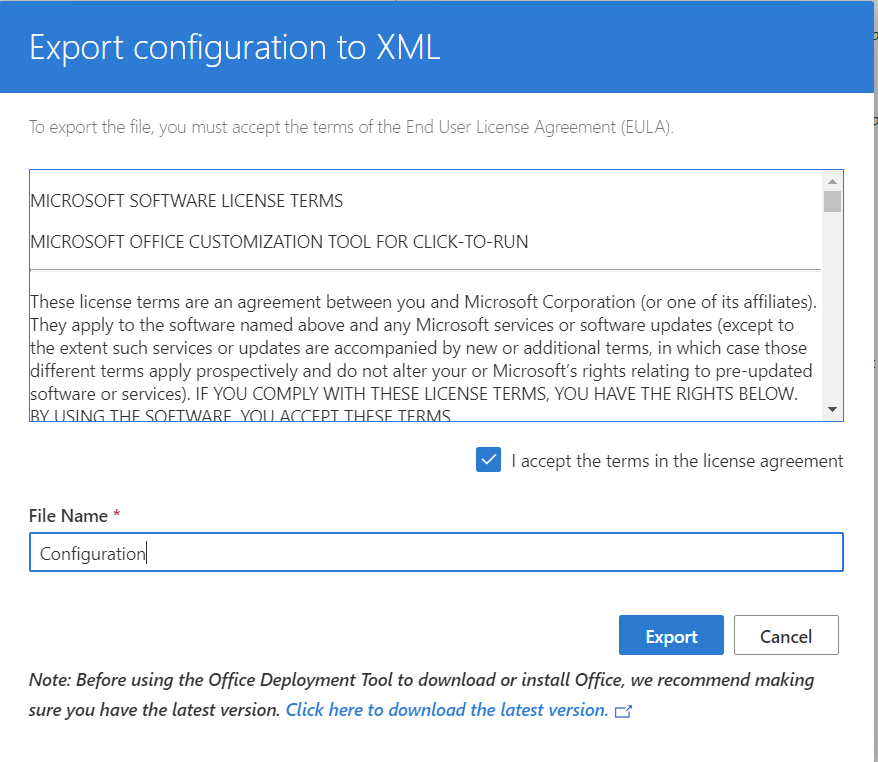
Once you have a configuration setup the way you like, then you will click “Export” in the top right corner and step through the export process of your XML configuration.
We recommend enabling “Upgrade to the selected architecture” to ensure that the new install overwrites what is currently on the machine.
You can name the exported file anything you want. We recommend keeping it specific for the client you’re making this configuration for so it is easy to identify when deploying.
Matching the download versions
Your script download is going to be configured for a specific version of Office. In order to identify which version of Office you will need to open your downloaded XML file and view which version of Office it is attempting to download:
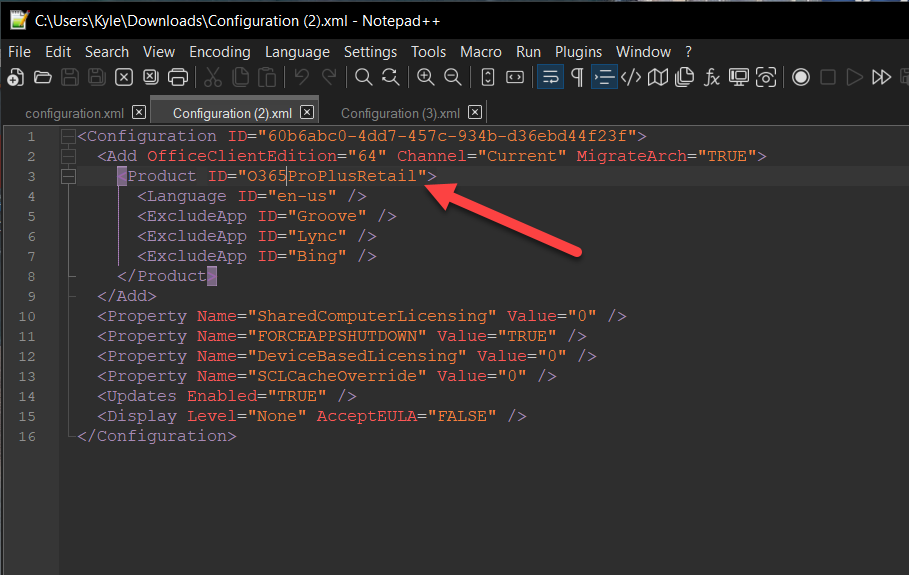
- If the Product ID reads: O365BusinessRetail then you will want to use the _1 (Download, Pick 1) Office 365 Business & Bus Premium DL script in Step 1 when downloading Office.
- If the Product ID reads: O365ProPlusRetail then you will want to use the _1 (Download, Pick 1) Office 365 Pro/Enterprise/Midsize DL Script in Step 1 when downloading Office.
- If the Product ID reads: O365SmallBusPremRetail then you will want to use the _1 (Download, Pick 1) Office 365 Small Business Premium DL Script in Step 1 when downloading Office.
This step is important as the downloaded version of Office will fail to install if the configuration XML doesn’t match the downloaded version of Office. If you are unsure which version of the script to use, then reach out to us and we should be able to help you identify which one.
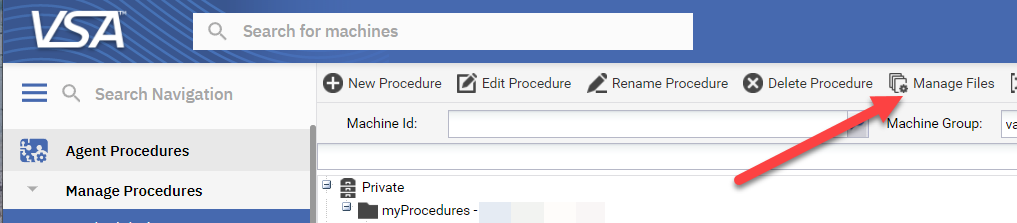
Uploading your custom XML
Now that you have downloaded your XML, the easiest way to deploy it with your script is by uploading it to the Kaseya VSA. Navigate to the Agent Procedures tab in Kaseya and click “Manage Files” in the top toolbar of the page.
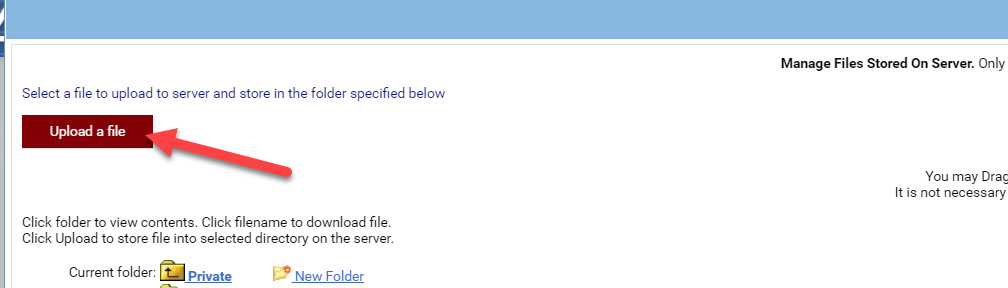
Then simply upload the file to your private files on the Kaseya VSA.
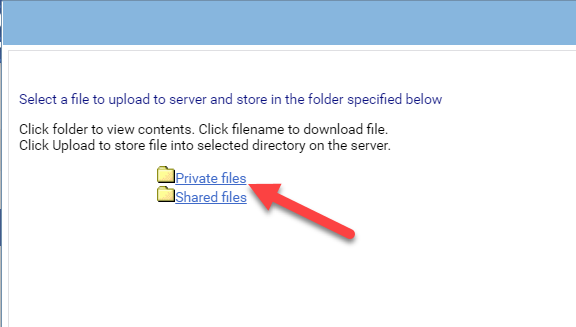
Feel free to choose other folders to upload your XML. This is purely for demonstration purposes. You could easily create a new folder to keep things tidy, or if you are on an instance of Kaseya that allows, you could upload the file to the shared files folder so other technicians would be able to access and modify the file.
Finally, attaching the XML to the script for deployment
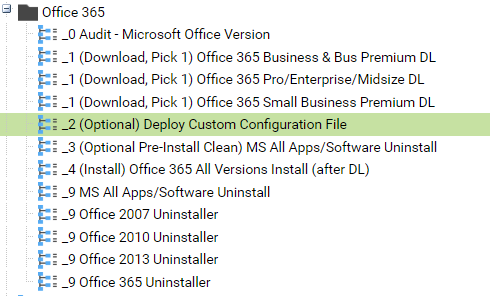
The last step of creating the custom XML is to upload this custom version to Kaseya. Inside the Office365 Agent Procedures folder you will want to edit the _2 (Optional) Deploy Custom Configuration File script.
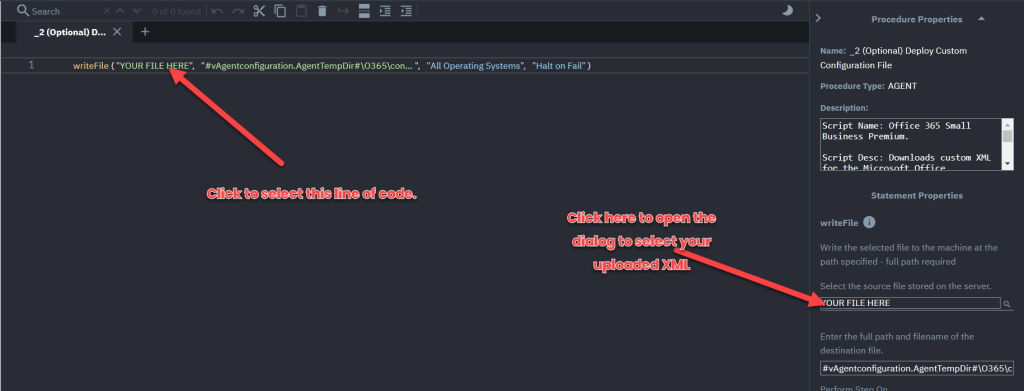
Once you’re editing the script. Simply select the only line of code in the agent procedure then in the right hand pane you will be able to click the magnifying glass next to the “YOUR FILE HERE” dialog to select your uploaded XML file.
Navigate to the uploaded configuration and you’re off to the races!
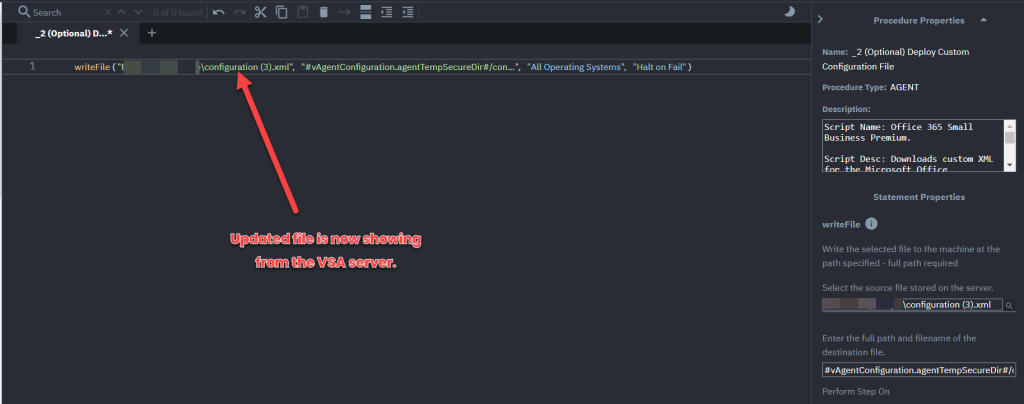
Save your edits and close the script.
Running the custom deployment
Now that everything is done, you can run the deployment. Simply:
- Select and run the correct download script (as outlined above).
- Run the _2 (Optional) Deploy Custom Configuration File
- Then run the _4 (Install) Office 365 All Versions Install (After DL)
And you’re done! You’ve just installed your custom Office config on as many machines as you wish.

What about just uninstalling Office?
While we didn’t really speak about this use case in this blog post. We have included scripts to remove Office from an endpoint. You could use this script to simply remove Office from an endpoint. But more often you might find yourself explicitly doing this as you install Office to ensure that the endpoint has a clean slate to install the Office suite.
You may find that the client has 32-bit, and you want 64-bit installed, or there is an old version that simply won’t automatically update. In this case, we have created “_9 MS All Apps/Software Uninstall”. Simply run this before you run Step 3 to remove all previous versions (NOTE: be careful, it will remove EVERYTHING, even that 2013 version of Visio that was hiding!).
So then the order of operations would be:
- Run an Audit
- Download the Office Suite
- Run the Uninstall script
- Optionally generate a custom config
- Run the Installer
This additional step might give you some peace of mind while installing Office to ensure that it matches your exact configuration and there will be no hiccups during the install process.
Enjoy and let us know if you have any issues, or have any suggestions for improvement. Remember this script and hundreds more are available with our ClubMSP.com subscription