Kyle, our scripting guru has come up with something truly special for all of us this week. We’re releasing a new script which is available now at ClubMSP and on our Kaseya servers to check and update Dell Warranty information on all Dell endpoints checking into Kaseya.

Why Use a Script Like This?
The benefits of a script like this are pretty straight forward. You’ll know when your customer’s machines are going to come off of warranty. This is an excellent sales opportunity to either sell them another warranty, or more likely, sell them another computer to replace the current one.
If you are operating as a VAR than this is a golden ticket to new hardware sales. If you’re operating as an MSP then this is a good metric as to when to expect you need to EOL client hardware and consider replacements.
For Go!Manage and Hosted Kaseya Partners
If you are on our Go!Manage or Hosted Kaseya servers then there really isn’t much left that you need to do. We have already set this script up as a server policy and it runs on every agent that checks into the server. This means that this information is available to you now. You can find it by clicking into any agent and viewing the custom fields. Or by modifying your Manage Agents Columns to show the warranty info on every page.
You’ll find the fields in the following screen shots:
You can also build reports on these custom fields.
For SaaS users, ClubMSP Members, and everyone else
If you aren’t running on our servers, then there is a little setup involved to get this script running. But it isn’t too difficult and I’ll go over the specifics below:
1.) Setup the custom fields. As mentioned above, you need to create two new custom fields in addition to the two fields which should already be present in Kaseya. These new fields are as follows:
- Warranty Exp
- Date Purchased
Detailed instructions on how to create a custom field can be found here.
2.) Create a View To Show Dell Machines that don’t have warranty information.
Create a view on your Kaseya server with the following settings:
3.) Download the script. You can find the script available for Download on ClubMSP.com. Download the Dell Warranty Check Script here.
4.) Set up a policy to run the script when new machines check in. The script will determine if it needs to run so you can simply have it run on all machines that do not yet have warranty information available.
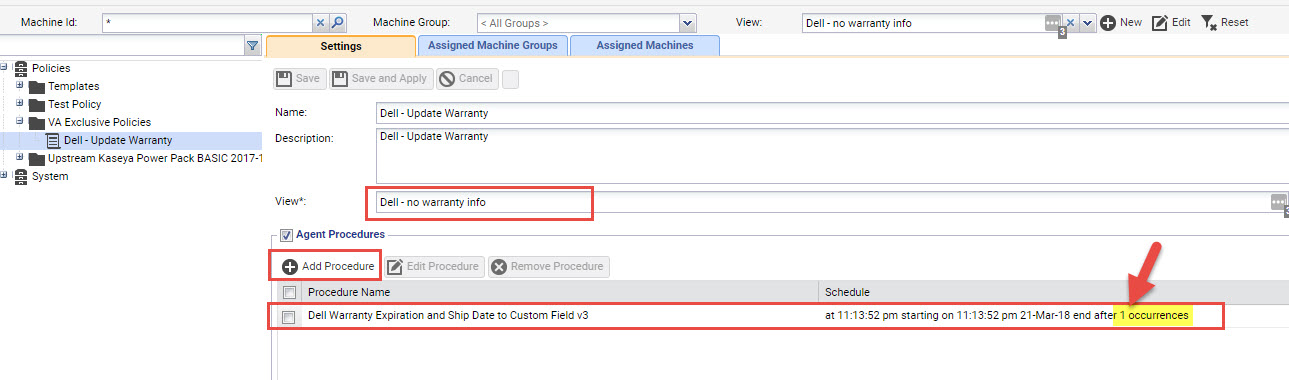
You can use the Policy Manager module to create this. Simply create a general policy with the following settings:
Final Thoughts
Good luck! We’re excited to continue to provide value to our partners. This script is also coming to the Automation Exchange for a modest fee. You can look for it there when it goes live in the next week or two.